134.1 Introduction
Use this AFO to create and maintain the conversion profiles that are used for the importing and exporting of Cataloguing records. A conversion is a collection of rules for converting bibliographic records from one record format to another record format, when import or exporting records in V-smart. For example, when importing MARC 21 records into a Smart format database, use a conversion to change MARC 21 records into Smart records.
Infor provides a ready-made set of conversions for the most widely used record formats. For example, Infor provides the MARC21-Smart conversion for converting MARC 21 format records into Smart format records.
134.2 Conversion profiles
After you have chosen this AFO an overview screen with existing profiles will be presented. You can edit existing profiles on this screen or create new ones.
Remember the name of your profile. You need to enter this in AFO 133 on the first tab of your input/output profile.

Options on the screen
: click this icon to create a new profile. You will first be presented with an input form where you must enter the profile name.
: select an existing profile and click on this icon to modify the profile.
: select an existing profile and click on this icon to delete the profile.
: select an existing profile and click on this icon to create a new profile by copying the existing one.
: with this option you can copy parts of a conversion profile into another profile.
The following steps are required to merge two existing profiles:
1) select a target profile and press the merge button
2) select a source profile and press the merge button
3) an intermediate screen will pop up allowing you to select the parts that must be copied from one profile to another
4) perform the actual merge (note that both profiles still exist)
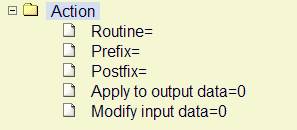
Creating a conversion profile is a complicated process. You must specify for each possible field type where it must go in V-smart. The example below shows a global overview of a profile to convert from the MARC21 format to the Vubis Smart format.

As you can see this uses a tree structure like Windows Explorer. Each item denotes a field and the corresponding rules.
When you collapse an item you get the following result:
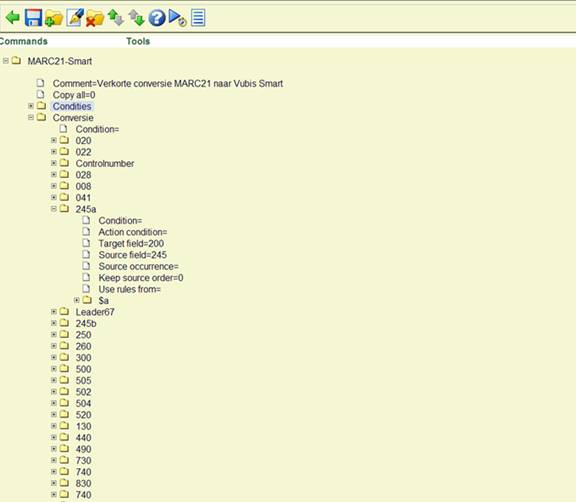
Each field must have a conversion that consists of three levels:
1. The conversion unit (top level)
· From which field(s) must the data be taken and in which corresponding field(s) in V-smart are they put.
2. The corresponding rule(s)
· From and to which subfields does the data go, must new subfields be created for new data. Are there conditions that determine when the actions below must be performed.
3. Action(s) to be performed
· When nothing is specified here, data is just copied as is. You can specify a routine that must be executed. This could be to deal with, inverting personal names, (adding or removing dashes in ISBN's, etc..
In this example you see that data in tag 245 of the incoming file must be copied to tag 200m in the Vubis Smart format. There are no rules or actions specified
When you have created this for every field, the conversion profile is ready for use.
134.3 Creating a profile
On the overview screen click on to create a new profile. You will first be presented with an input form where you must enter the profile name, the click .
You are now at the top of the tree structure where nothing exists as yet:

You can add a comment to the profile by selecting this field and clicking on the button. This comment will be displayed in the Description column on the overview screen
The setting “Copy all” can be used when the data to be imported already conforms to the standard in which they must end up in your database. When you have for example a MARC import file that must go into the MARC format within V-smart, you can use this option. For real conversions (from one format to another) this must be 0 (zero).
Select the top folder (with the name of your profile) and click on , the system will prompt for Conversion or Condition.
134.4 Conditions
In some cases parts of the conversion must be made dependant on certain conditions, like the existence of another field or subfield. Conditions can be created at any moment but only become available in the conversion rules after you have saved the complete set. Conditions consist of several elements combined with a Boolean operator:

Fields in an element:
Field: The code of the source field.
Occurrence: Sequence number of the field (default = 1).
Subfield: The code of the source subfield (default: all).
Occurrence: Sequence number of the subfield (default = 1).
Position: Start position of data (default = 1).
Length: Length of data (default = total length).
Operator: Operator: = equal to, > greater than, < less than (default = "=").
Text: Text for comparison (default: emptystring).
For each conversion step you can select a predefined (by you) condition:
Example 1
Check if field 500 exists:
Element/Field: 500
Element/Operator: =
Boolean expression: NOT 1
The element evaluation returns True if field 500 does not exist (in other words, if the result of the check for field 500 is an empty string). As the condition wants to check the opposite, the NOT keyword is used in the Boolean expression to invert the check.
Note that the operator could have been omitted, as "=" is the default.
Example 2
Check if field 008, position 9, is "d" and if field 260, subfield c, position 1 and 2, is equal to "19".
Element 1/Field: 8
Element 1/Position: 9
Element 1/Operator: =
Element 1/Text: d
Element 2/Field: 260
Element 2/Subfield: c
Element 2/Position: 1
Element 2/Length: 2
Element 2/Operator: =
Element 2/Text: 19
Boolean expression: 1 AND 2
Note:
In both cases the operator could have been omitted, as well as the position in the second element.
134.5 The conversion units
The conversion is a collection of conversion units, where a conversion unit consists of a number of conversion rules. A rule can have zero, one or more actions to manipulate the data.
134.5.1 The unit structure
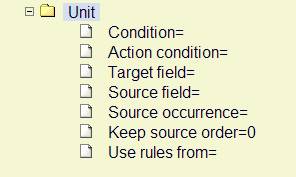
Condition: Condition for the execution of this conversion unit.
Action condition: Condition derived from an action upon the data. At this level, only the Check conversion variable value action can be used.
Target field: Code of the target field. In some cases this may be omitted, for instance if a conversion variable value is set without creating a target field.
Source field: Code of the source field. Also a contiguous range of source fields may be specified, where the first and last field number are separated by a "-".
Source occurrence: Occurrence of the source field (default = 1).
Keep source order: If the value of this field is 0, the source subfields will be fetched according to the information in the rules (see below). If the value of the field is 1, the source subfield order is maintained, and the rules are executed in this order.
Use rules from: If the conversion of this field is identical to the conversion of another - already defined – field, then there is no need to redefine the rules – a simple reference to the rules of the other field is sufficient. Note that in order to be able to use the rules of another field, the conversion data must have been saved after the creation of these rules.
Note:
Warning: if the name of the other unit changes, this field must be changed as well.
134.5.2 The rule structure
Conversion variables and Action conditions
Conversion variables are very useful for use with the so-called Action conditions. Besides the "normal" conditions, conversion can also made dependant of these Action conditions.
In general, an Action condition yields a True result if the result of the action is not an empty string. However, it can also be used to check a previously set conversion variable. For more details about how to set or check a conversion variable, see the chapter Conversion actions
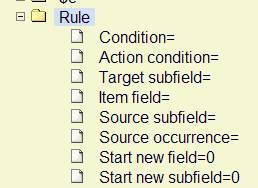
Condition: Condition for the execution of this conversion rule.
Action condition: Condition derived from an action upon the data. At this level, only the Check conversion variable value action can be used.
Target subfield: Code of the target subfield.
Item field: Code of a predefined holding element field. A choice is made from a list.
Source subfield: Code of the source subfield.
Source occurrence: Occurrence of the source subfield (default = 1).
Start new field:
·
Current target field is different from unit target field: new target field is created
Else
· Value=1: new target field is created.
· Value=0: data will be added to the current target field data
Start new subfield :
·
Current target field is different from unit target field: new target field is created, new target subfield is created
·
Current target field is unit target field, current target subfield is different from rule target subfield: new target subfield is created
Else
· Value=1: new target subfield is created.
· Value=0: data will be added to the current target subfield data
134.5.3 The Action-structure
Routine: Action routine to be used. For a detailed description of the routines, see the chapter Conversion actions.
Prefix: Prefix to add to the data as obtained by the action routine. This will only have effect if there are already any data preceding the obtained data.
Postfix: Postfix to add to the data as obtained by the action routine.
Apply to output data: Actions are performed upon the input data buffer. However, if the value of this parameter is 1, then the action is performed upon the current output data.
Modify input data: The data that are obtained by the actions are added to the current output data. However, if the value of this parameter is 1, then the data obtained by the action will replace the data in the input buffer.
Data can be manipulated using conversion actions.
Note that the behaviour of the conversion actions depends upon the following settings:
·
Apply to output data
·
Modify input data
· Apply to output data = 0 / Modify input data = 0
- The action is performed upon the current input data and the result is added to the current output data.
· Apply to output data = 0 / Modify input data = 1
- The action is performed upon the current input data, which are replaced with the resulting data.
· Apply to output data = 1 / Modify input data = 0
- The action is performed upon the current output data, which are replaced with the resulting data.
· Apply to output data = 1 / Modify input data = 1
- The action is performed upon the current output data, and the result replaces the current input data.
134.6 General steps for conversions
1. Determine all fields of the source file. Note down fields and subfields.
2. Determine the target fields within the bibliographic format.
3. Check whether there are conditions to determine if fields must be imported or not or if certain actions must be performed.
4. Create the relevant conditions.
5. Starting creating the conversion elements.
6. Ensure you apply a clear naming convention for all elements, so you can still have a good overview even with extensive profiles like the MARC profile below:

134.7 Relations
The special "LNK" subfield can be used in conversions to establish a link with an existing authority in the database. The structure of the "LNK" subfield is "key / index", index means the authority index which must be searched with the specified key, in order to find the authority record with which the link must be made.
Example
"03577899/Index035" will search in index "Index035" with key "03577899".
If other subfields must be created for the field that contains the “LNK” subfield, the “LNK” subfield must be the first subfield.
Relations with other bibliographic records are used to establish links between: series title and parts, translated works and the original works, etc. To establish such a relationship to another bibliographic record you must specify a field LNK, which may contain the following subfields:
|
Subfield |
Contents |
|
$a |
Relation type (see AFO 151 for the valid number codes) |
|
$b |
Record-ID of the target record (only if present in the same import file) |
|
$c |
Name of the matching profile that must be used to find the corresponding record. |
|
$d |
The matching key if $c is in use |
|
$x |
Data to be copied to the record to which the relationship is. |
|
$y |
Data to be copied from the record to which the relationship is. |
The structure of a $x or a $y subfield is:
destinationfieldcode/subfieldcode=sourcefieldcode/subfieldcode
whereby the next occurrences are separated by a colon (:). Instead of sourcefieldcode/subfieldcode you can also specify an actual string of characters, that must be preceded by a percentage sign (%).
Example:
910/$a=900$t:910$b=900/$v:910/$c=%CDROM:801/$b=801/$b
In the following screen shots you see how a tag 1620 from a PICA record is translated in the conversion to a relation to another record within the database.
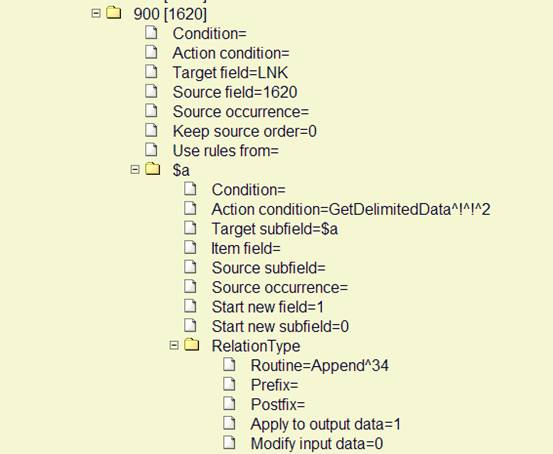
· The target field is LNK. This is the clue for the import module that a relationship must be created.
· The rules for creating virtual subfields contain a condition “Action condition”. Here it is specified that something must be put between two exclamation marks. In practice this will most likely be the record ID of the related record (in the example this is PPN).
· Subfield $a of this “virtual” LNK-field must be filled with the relation type. For this the actual string “34” is entered for the action called RelationType.
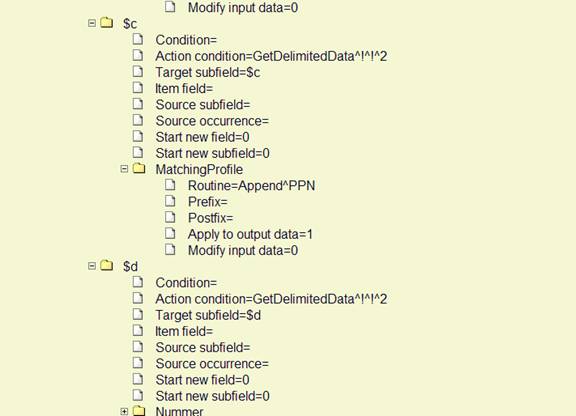
· Subfield $c must contain the name of the matching profile. In AFO 114 a matching profile called PPN was created, which can be used. So we add that name with the routine Append (Append text).

· Subfield $d gets the matching key. The matching profile must receive the PPN of the related record. We retrieve this PPN with the routine GetDelimitedData (part between exclamation marks).
134.8 Importing authority records
You can also use the import module to import authority records. This includes thesaurus records.
You must specify in the conversion rules to which authority database the records must be added. You can make this dependant on certain conditions, but you can also specify it as a fixed value in the rules. You do this by nominating a virtual field called DBS as the target field, with the database number as content.
Below is an example whereby in all cases the records go to database 24.

Then you can create the rest of the conversion.
Note
Make sure you use the authority format (or thesaurus format) as reference and not the bibliographic format.
For references you must define links to other records. This can be See References, See also References, Broader terms, Narrower terms, etc. For creating relations between authority records you must specify the name (the code) of the field from which the relationship is established as the target field.
Note
The system will create the reciprocal link automatically.
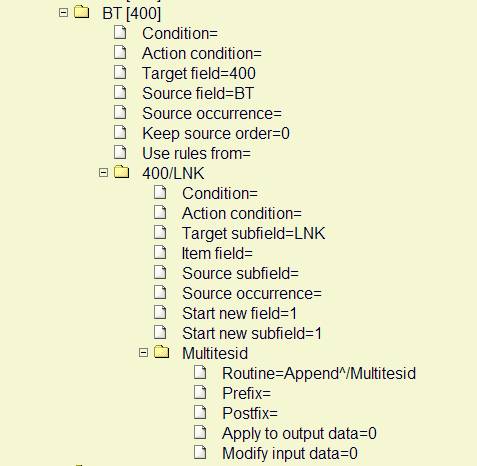
For the target field you then create a virtual subfield that must be called LNK. The contents of this subfield must have the following structure:
<recordnumber>/<indexname>
In the test result of the conversion the conversion of this part will look like:
400.001/LNK 4/Multitesid
· 400 is the name (code) of the field within the authority format;
· .001 is the sequence number of the occurrence of this field (a second occurrence of field 400 would get 002);
· /LNK is the name of the (virtual) subfield;
· 4 is the record number to which the relation must lead and which is indexed in an index called Multitesid;
· /multitesid is the name of the index in question, preceded by a slash.
An example of how to achieve this result:
134.8.1 Reference records
You can also import authority records that will not link directly to bibliographic records. They will mostly contain a reference to another authority record that does link directly to bibliographic records. Records containing a reference to another authority record cannot be used as entries to bibliographic records. Conversely records that are entries to bibliographic records cannot contain references to other authority records. If you try importing such relations the system will report them as errors.
You can influence the process by designating such an authority record as reference record during import. A reference record must always link to only one other authority record. If the record that is designated as reference record already is present in the database at the moment of importing, the system will check if the existing record is an entry to bibliographic records. If so, the bibliographic records will be flipped to the term to which the reference leads.
Example:
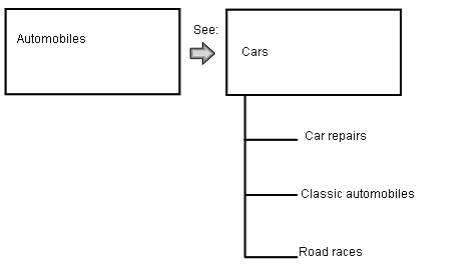
Figure 1 – Existing situation
Now you import the authority record “Cars” that contains a reference to “Automobiles” and you designate “Cars” as the Reference record.
This results in the following situation:
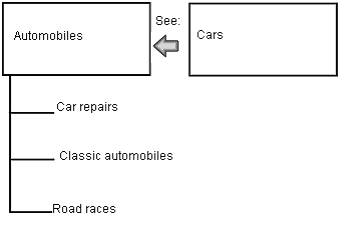
Figure 2: Situation after the import
You designate a reference record by making a conversion rule that will create a virtual field 000 and fill this with the letter R. For example:

Under Conditions you can specify which records will be eligible for this. This can be for example if they contain a USE field or a SEE field.
134.9 Importing items
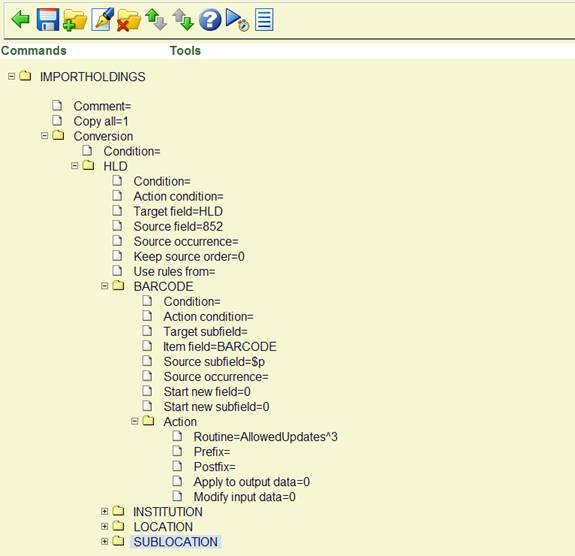
For importing objects use “HLD” (without the quotes) as the target field in the conversion rule.
Under the rules branch of this conversion element u can find the item information part. With this you can use information from the source file to create an item record. By putting a certain value in the item information field you can ensure that information from the source field is used as part of the item. The item information part has a list of possible values. U can choose for things like: barcode, institution, location, material type etc.
Example of rules for an item conversion:
Note:
In this example no bibliographic details are converted en the “copy all” flag is set for bibliographic fields.
Ensure the “Start new field” flag is set to 1 for the first item field (in this case BARCODE).
The updates that can be performed for the shelfmark can be specified for BARCODE with an “Action” definition of “Allowed updates”.
Choices are:
· Add
· Modify
· Add or Modify (standard)
Validation of data
The following validation checks will be performed (only if a value is assigned to the field):
· Check existence of barcode (see below)
· Check validity of barcode (see below)
· Check validity of institution
· Check validity of location
· Check validity of sublocation
· Check validity of material type
· Check validity of volume number
· With update/delete check if record number of the existing barcode matches the record number of the current imported record.
In case one of these checks finds an error, the item will not have been processed.
The following data elements can be modified when an item is updated:
· Institution code
· Location code
· Sublocation code
· Material type
· Volume
· Year
1. The Owner institution/location and Manager institution/location can not be changed by the loader. For new items they will be identical to the specified current institution/location and will remain unchanged after update of existing items.
2. "material type" en "Statistical code" (if in use) are mandatory fields for new items.
3. If there is no value for institution/location, the current institution/location will be used.
4. Notes can only be added, not updated.
5. Because electronic holdings are repeatable, their field must be preceded by the URI, followed by a colon: uri:field-data. If there is no URI the data will be applied to the first electronic holding. To add the URI in the prefix you save the URI, followed by a colon as a conversion variable and call this variable for each field.
6. Electronic holdings can not be deleted.
7. Notes and electronic holdings are repeatable: all occurrences of the same field must be saved to a different HLD field
8. Fields from the main ^BC node and also optional fields can be deleted by assigning ### as data.
134.10 Testing the conversion
Testing the conversion can be done at several levels. Especially during the creation of a profile one must check what the result is of various actions. For this you need to load a test file as described in 1.3. When this is done you can click on the button.
You can then specify from which record you want to test and how many records you want to process:

Click to start the test conversion. This can take a while, depending on the complexity of the conversion and the number of records. Eventually a Notepad window will appear with the results:

In this example you first see the incoming data per record. Then a blank line followed by the data as they will be added to the database. This gives you a good impression of what the conversion will do.
Note:
Do not use the same sample records over and over again, because that may not give a good overview. Certainly with big files you need to test the conversion on several samples, because nature and content of records can vary enormously.
When you make changes as a result of test runs, remember to save the set with the button , before doing another test run.
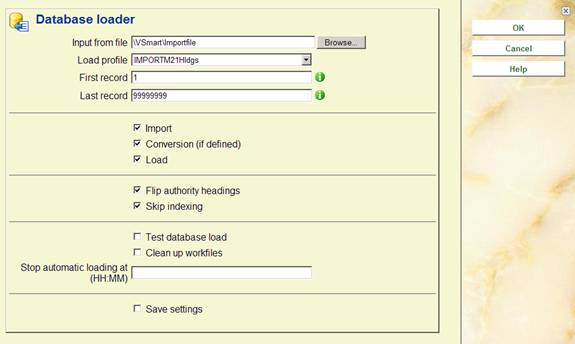
When you are satisfied with the test result you can proceed to simulation of the whole process. Make sure that the first tab in AFO 133 refers to your corresponding conversion profile. Go to AFO 131 and choose your import profile.

Load your file again, but with all options flagged as in the example above. The import module will now test the whole process from import to conversion, to loading in the database. Matching and merging profiles will be tested. But because “Test database load” is checked the records will not actually be added to the database. All records will be put in the Savelist you have specified on the third tab of your profile in AFO 133. In this Savelist you will now see a report on all records, with per record information on:
· Would this record have loaded in a real situation.
· Was an identical record already present and what have matching & merging settings done with it.
· What would the eventual record look like.
Because “Clean up workfiles” is checked any previous test files will be deleted.
Note:
This Savelist is not a real list of titles that point to records in the database. This list only contains temporary titles to give an impression of the conversion.
When this test has also been completed satisfactorily, the real import can take place.
134.11 Definitive conversion
When the import and conversion profiles function satisfactorily you can use them at any time and as often as you need, for example for a weekly load of new titles. The real load is also done through AFO 131, but only with the first three options checked:
In this way titles are effectively loaded into the database. Especially the steps “Conversion” and “Load” can take a long time for big files. During the load titles will also be indexed.
Note
Addtional technical information can be found in the appendix.